The Manage Locations window consists of the:
Main tab. Used to enter Company and Location name and contact information, dangerous goods information, alternate pricing and tax locations, and allows grouping Locations together for consolidated reporting.
Notes tab. Used to document any information you want about the location that appears on related reports.
Logo tab. Used to upload a custom logo to appear on all reports.
Note
To use the same settings at all locations, select <Company> from the list.
Then set what's different at each Location.
Warehouse Locations and Postings
Warehouse locations do not have pricing; therefore, each warehouse requires an associated retail location from which to pull pricing and taxes. Similarly, you can redirect a regular location to a different location for pricing and taxes, if needed. Your postings and reports may show the redirected locations rather than the actual locations.
What you'll find:

I want to read the white paper about Divisional & Regional Reporting (with lots of screenshots).
Main Tab
To complete the Main tab
* indicates a required field
Note
Location Type displays the type of location (e.g. full or warehouse).
On the File menu, point to Manage and then click Locations.
The Manage Locations window opens.
In the Location box, enter the location that contains settings to specify.
<Company> settings will be overridden by a Location's settings.
Click Retrieve Data.
The rest of the window is available for use.
In the Name* box, enter the location’s name.
Ensure you enter a unique name for the location so that the location is easy to identify (e.g., Edmonton Warehouse).
Notes
Company Name displays your official company name that you set up with Tronia.
The following information appears in work order, loadout ticket, invoice, statement, and transportation headers.
In the Address box, enter the location’s address.
In the City box, enter the city.
In the Province box, enter the province.
In the Postal box, enter the postal code.
In the Phone box, enter the location’s main phone number.
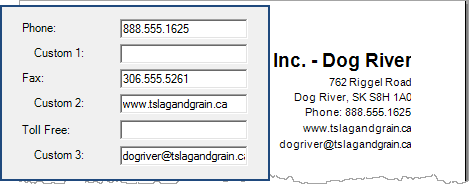
In the Custom 1 box, enter text to replace the Phone label and number.
In the Fax box, enter the location’s fax number.
In the Custom 2 box, enter text to replace the Fax label and number.
in the Toll Free box, enter the location’s toll free phone number.
In the Custom 3 box, enter text to replace the Toll Free label number.
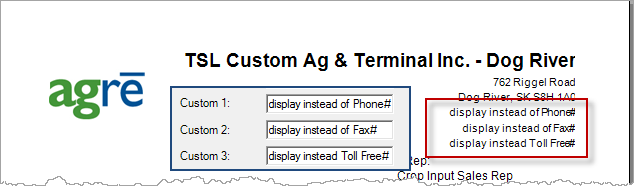
for example, display your website and email instead of fax and toll free numbers
In the Mapping Code box, enter a location code (used when agrē communicates with external systems).
Note
Location for Posting displays the location you specified for postings.
In the Location for Pricing box, enter the location that you want this location to use for pricing.
Only full locations that have not already been redirected are available to choose from. If this location is a warehouse, a location for pricing is required since warehouse locations do not have pricing. A location for pricing is optional for full locations.
Usually this is the same as the Location for Posting, but it can be different.
(Optional for warehouse locations) In the Location for Taxes box, enter the location that you want this location to use for taxes.
Only full locations that have not already been redirected are available to choose from.
Usually this is the same as the Location for Posting, but it can be different.
Select the location's Division from the drop down menu.
Select any Location Groups.
In the 24 Hour Number box, enter this location’s 24 hour emergency contact number.
All companies that transport dangerous goods must have an emergency contact number.
Transport Canada recommends this text: In the event of an emergency involving dangerous goods call CANUTEC at 1-888-CAN-UTEC (226-8832).
In the Emergency Response Plan Contact Number box, enter the location’s phone number to call when the Emergency Response Plan needs to be implemented.
All dangerous goods products require emergency response plans (i.e., the required steps to follow in case of an emergency). When you call the emergency response plan contact number, the response plan number is required.
In the AWSA No box, enter the location’s Agrichemical Warehousing Standards Association number for the dangerous goods products belonging to this location.
This used to be called the CPIC number. It must appear on transportation documents.
(optional) In the Permit Name and Permit # boxes, enter permit details that will appear on the TDG for location transfers (base layouts).
e.g. Permit Name = Ammonia Cert #
e.g. Permit # = 1234567890
Notes Tab
You can enter notes about the location that appear on printed reports (e.g. invoice notes appear on Invoice reports).
To complete the Notes tab
Click the Notes tab.
Enter notes in the applicable boxes for the location.
These notes will be displayed on the corresponding document/report.
Note
AR Payment comments will display on both the Payment and Prepayment receipts.
Tips
If you would like to have the same note print for every location, choose Location=<Company>, type in the notes, and check On save update all locations with these notes before you Save.
If any Company notes are blank (no text entered), you'll be prompted: Do you want to empty out existing location notes?
Yes: Updates all notes for all locations including the blank notes - existing Location notes are overwritten with Company blank notes
No: Updates all notes for all locations excluding the blank cells - existing Location notes are retained
If one location needs different notes, you can later edit the ones for just that location.
For Invoices and POS Invoice Notes only - the Current Location Notes are stored on the invoice when the invoice is saved. Even if the Locations Notes have been subsequently updated, the original Location Notes will display when reprinting the invoice at a later date (unless the invoice has been edited - at which time the original notes will be replaced with the Location Notes current at the time of the edit when it is saved).
You can use the Audit/Admin > Notes data export to double check all notes in one place.
Save your changes.
Logo Tab
A single logo can be set for the whole company, or each location can have its own.
To complete the Logo tab
* indicates a required field
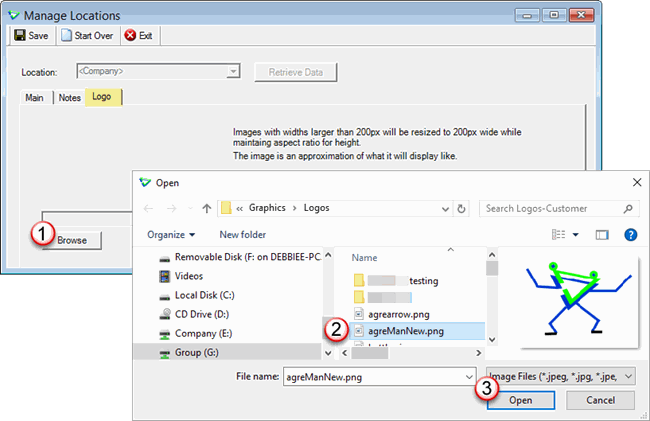
Click the Logo tab.
Click Browse.
Navigate to where you've saved the logo file on your local drive or network, select* and Open it.
max file size = 2 mb
file types = JPE, JPG, JPEG, PNG, GIF, TIF, or BMP
best sizes are ratios of 1:1 or 1:2
for example 1" high x 1" wide, or 1" high x 2" wide
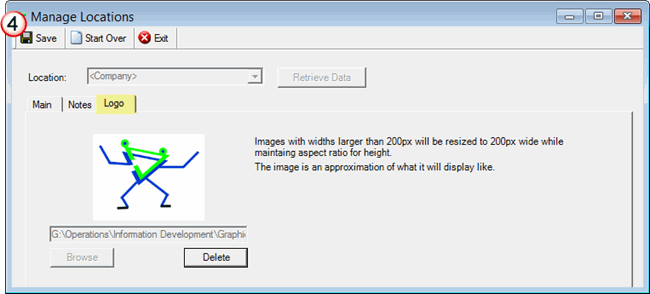
Save to apply the change.
Location Logo Exceptions
The following reports will always use the <Company> logo
Accounts Receivable
Payment Receipt
Customer Statement
Accounts Payable
Purchase Order
Purchase Invoice