In order to determine a price for a product, agrē completes three general processes:
applying any applicable limited-time sales
getting the product’s price
applying any applicable discounts.
Discount groups are included within this process.
You can add Discount Groups that offer customers discounts by:
product type (e.g. Micronutrients)
individual product (e.g. Achieve)
unit type (e.g. CASE)
Discounts can be positive or negative (surcharge), and they stop when $0 is reached. Products can be individually excluded from Product Type discounts.
Once you set up your Discount Groups, you then assign customers to the groups so that they receive the discounts.
When a customer in a Discount Groups purchases products included in a discount, the discount is automatically applied, reducing the overall selling price of the product. If a customer purchases a discounted product that is also included in a limited-time sale, (and the sale is set up to allow discounts on top of sale prices), the discount may further reduce the overall selling price of the product.
If you specify discounts for both product types and individual products within that product type, the product discount will over ride the product type discount. For example, Achieve has a discount as an individual product, and the Chemical product type also has a discount. In such cases, the Achieve discount overrides the Chemicl (product type) discount.
If you have specified a prepaid price level, and flag the product sale as prepaid, the prepaid price will override the discounted price.
Use the Manage Discount Groups window to add, edit, use or not use, and remove discount groups.
What you'll find:
Business Rules for Customers in Multiple Discount Groups
A customer that exists in multiple discount group could be eligible for multiple discounts, but only one discount will apply.
When more than one discount group applies during the price calculation these are the rules of which discount group applies:
Product/Unit specific discounts override product type discounts
highest Percentage discount first, then highest Dollar discount
Product Type discounts override unit type discounts
highest Percentage discount first
Unit Type discounts (applies to all product types and products)
highest Percentage discount first
Note
This does NOT mean that necessarily the highest discount value is used.
Caution
It is advised not to setup multiple discount groups with the same product types or unit types, then assign them to the same customer.
Adding Discount Groups
Use the Manage Discount Groups window to create an active discount group. Once created, you can add and remove customers to and from the discount group.
What you'll find in Adding Discount Groups:
To add a discount group
Navigate to Accounts Receivable > Manage > Discount Groups.
The Manage Discount Groups window opens.
In the Description column, enter a unique description for the discount group (e.g., Loyalty Card, Family & Friends).
Ensure the Active check box is selected.
In Use is selected by default after the description has been entered.
Click Manage Discounts.
A message appears indicating that the discount group must be saved.
Click Yes.
The Add Discounts To Discount Group window opens.
Select the tab of the corresponding discount type you want to add: Product Types, Products, or Unit Types.
Choose the Product Type, Product, or Unit Type.
In the Percent Discount box, enter a discount percentage.
- or-
In the $ Discount box, enter the number of dollars to deduct from the usual selling price.
Use a positive number for a discount or a negative number for a surcharge.
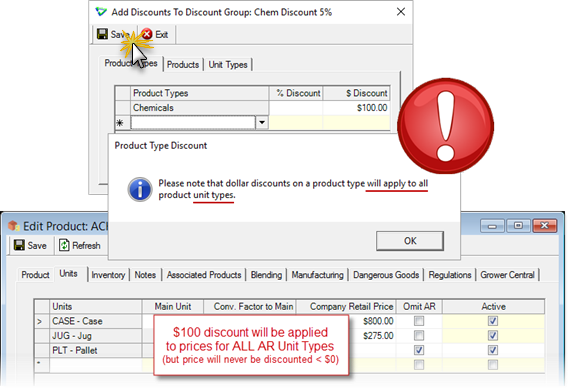
CAUTION
$ Discount for a Product Type will apply to ALL unit types, not just the main one.
Note
Products with Exclude from Group Discounts checked cannot be added.
Tip
Add all discount groups and discounts before clicking Save since saving also closes the window.
Click Save.
The Add Discounts To Discount Group window closes and the Manage Discount Groups window appears.
Adding Customers to Discount Groups
Use the Add Customers To Discount Group window to add customers to specific discount groups.
After creating discount groups and adding product and product type discounts, you can add customers to the groups in order for the discounts to apply to invoices. Customers can only belong to one discount group.
To add a customer to a discount group
Navigate to Accounts Receivable > Manage > Discount Groups.
The Manage Discount Groups window opens.
In the Description column, select the discount group to add a customer to, then click Add/Remove Customers.
The Add Customers To Discount Group window opens.
Under Find Customers Using, find customers by using the various search criteria.
Click Retrieve Customers.
Under Customers To Add, the search results are shown. If no results are found, the list is blank and the message “No Customers found” appears under Customers To Add.
In the Add To Group column, check the boxes of the customers you want to add to the discount group.
Tip
To add several customers at once use generic filters, like the customers's home Location, to retrieve multiple customers then check Add to Group only for the customers you want to add.
Note
On the Customers In Discount Group tab the customers already belonging to the discount group are listed. You can remove customers from the discount group by unchecking Keep in Group.
Click Save.
The Add Customers To Discount Group window closes and the selected customers are added to the discount group.
Removing Customers from Discount Groups
Use the Add Customers To Discount Group window to remove customers from specific discount groups.
To remove a customer from a discount group
Navigate to Accounts Receivable > Manage > Discount Groups.
The Manage Discount Groups window opens.
In the Description column, select the discount group to remove a customer from and then click Add/Remove Customers.
The Add Customers To Discount Group window opens.
Under Customers In Discount Group, in the Keep In Group column, clear the Keep In Group check boxes of the customers you want to remove from the discount group.
Tip
To quickly select and clear all the customers in the Customers In Discount Group list, click Select All and Deselect All.
Click Save.
The Add Customers To Discount Group window closes and the selected customers are removed from the discount group.
Editing Discount Groups
Use the Manage Discount Groups window to edit any of your existing discount groups at any time by changing their descriptions and product and product type discounts. You can also set the discount group to be in use or not in use.
To edit a discount group
Navigate to Accounts Receivable > Manage > Discount Groups.
The Manage Discount Groups window opens.
In the Description column, change the description of the discount group.
Note
You can edit information in the discount group, including product and product type discounts. While editing, you can also add new products and product type discounts to the discount group.
In the Description column, select the discount group with product and product type discounts to edit and then click Manage Discounts.
The Add Discounts To Discount Group window opens.
Edit the data, and add products types and/or product discounts to the discount group, as needed.
To edit items under Product Types, select the product type to edit and then select a new product type from the list.
To edit items under Products, select the product to edit and then click Edit Product.
When you are finished making changes, click Save.
The Add Discounts To Discount Group window closes and the Manage Discount Groups window appears.
Click Save.
Activate/Deactivate Discount Groups
Use the Manage Discount Groups window to set discount groups to in use or to not in use. When you add discount groups, they are automatically set to be in use, but you can also set a discount group that is not in use to in use.
When a discount group is not in use, you can still reference it in the database and view it in lists, but the group discount will not be offered to customers.
Note
In use and not in use settings are the same as activating and deactivating settings; however, not in use items are referenced in various lists in the database whereas deactivated items are hidden in lists.
To deactivate a discount group
Navigate to Accounts Receivable > Manage > Discount Groups.
The Manage Discount Groups window opens.
In the Active column, clear the check box of the discount group you want to set to not in use.
Click Save.
To activate a discount group
Navigate to Accounts Receivable > Manage > Discount Groups.
The Manage Discount Groups window opens.
In the Active column, check the Active check box of the discount group you want to activate.
Click Save.
Removing Discount Groups
Use the Manage Discount Groups window to remove discount groups from the database. You cannot remove discount groups that have been used or are in use on invoices but if you not longer want to use it you can deactivate it instead.
To remove a discount group
Navigate to Accounts Receivable > Manage > Discount Groups.
The Manage Discount Groups window opens.
In the Description column, select the discount group to remove.
Click Remove Discount Group.
Note
If the Remove Discount Group button is not available, the discount group you selected is in use and cannot be removed but it can be deactivated.
Click Yes to confirm the removal.
The discount group is removed.
Click Save.